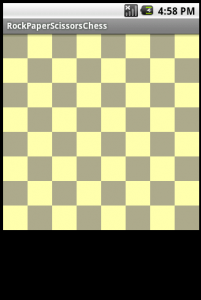
If you have followed the previous post you will have a perfectly black screen. This is not terribly exciting so we are going to make our view draw a chessboard pattern.
The two functions to override in custom views are onMeasure() and onDraw().
The onMeasure function works out the size of the view. The parameters for this function are integers that encode measure specifications. At the moment we are just going to extract the sizes and store them for use in the onDraw() function.
We can extract these dimensions using the MeasureSpec.getSize(). While we are here, we are also going to calculate the size of the tiles on the board and store that too.
--Board.java--
package uk.co.quarterstaff.rpschess;

/*Snip existing imports*/

public class Board extends View {
    public Board(Context context, AttributeSet attrs) {/*snip*/}

    private float mTileWidth  = 0;
    private float mTileHeight = 0;

    @Override
    public void onMeasure(int widthMeasureSpec, int heightMeasureSpec) {
        int width = MeasureSpec.getSize(widthMeasureSpec);
        int height = MeasureSpec.getSize(heightMeasureSpec);

        mTileWidth = width / 8;
        mTileHeight = height / 8;

        setMeasuredDimension(width, height);
    }

}
The onMeasure() function must call setMeasuredDimension() with the width and height of the control or the activity will throw an exception and force close, so we call that on the last line once we’ve worked everything out.
So now we know how big our control is going to be and, by extension, how big the tiles are going to be, we can draw the board at last.
To do this we override the onDraw() function. This function takes the canvas we are going to draw on as a parameter and we will draw a sequence of alternating coloured squares.
We will need two paint objects, one for light squares and one for dark squares.
Then we will run through a nested loop and use the canvas.drawRect() to draw the tiles.
--Board.java--
package uk.co.quarterstaff.rpschess;

/*Snip existing imports*/
import android.graphics.Canvas;
import android.graphics.Color;
import android.graphics.Paint;
import android.util.AttributeSet;
import android.view.View;
public class Board extends View {
     public Board(Context context, AttributeSet attrs) {/*snip*/}

     private float mTileWidth  = 0;
     private float mTileHeight = 0;
     @Override     public void onMeasure(int widthMeasureSpec, int heightMeasureSpec) {/*snip*/}

     @Override public void onDraw(Canvas canvas) {
         Paint light = new Paint();
         light.setColor(Color.parseColor("#FFFFAA"));

         Paint dark = new Paint();
         dark.setColor(Color.parseColor("#AAAA88"));

         for (int i = 0; i < 8 ; i++) {
             for (int j = 0; j < 8 ; j++) {
                 if ((i+j) % 2 == 0)
                     canvas.drawRect(j * mTileWidth , i * mTileHeight , (j+1) * mTileWidth , (i+1) * mTileHeight, dark);
                 else
                     canvas.drawRect(j * mTileWidth , i * mTileHeight , (j+1) * mTileWidth , (i+1) * mTileHeight, light);
             }
         }
     }

}
The mod tells us if the tile we are on is even or odd and selects the right paint class to get a chequered effect. Run this on your device or in the emulator and you can see...
A squashed chessboard.
Unless the screen of your device is perfectly square, the Board view will fill it completely and make the tiles rectangular instead of the neat squares we're after.
To remedy this we are going to have to go back to the onMeasure function and start laying down the law about how big our view should be. Between extracting the width and height and calculating the tile sizes we need to add a quick check to see if the width and height are different and set one to the other.
--Board.java--
/*snip existing code*/

      @Override
      public void onMeasure(int widthMeasureSpec, int heightMeasureSpec) {
          int width = MeasureSpec.getSize(widthMeasureSpec);
          int height = MeasureSpec.getSize(heightMeasureSpec);
          if (width < height) { height = width; }
          mTileWidth = width / 8;
          mTileHeight = height / 8;
          setMeasuredDimension(width, height);
      }
/*snip existing code*/
If the width is less than the height then we set the height to the width to end up with a square. The only immediate problem left is that if the user does something crazy like turn their phone on its side, or indeed lays it not-entirely flat for a game, the view will still fill the available width so we'll be left with a similar squashed board as before so we need to fix the orientation of the activity. Edit the AndroidManifest.xml and add screenOrientation="portrait" to the activity's declaration.
<?xml version="1.0" encoding="utf-8"?>
<manifest xmlns:android="http://schemas.android.com/apk/res/android"
    package="uk.co.quarterstaff.rpschess_do_over"
    android:versionCode="1"
    android:versionName="1.0" >

    <uses-sdk android:minSdkVersion="8" />

    <application
        android:icon="@drawable/ic_launcher"
        android:label="@string/app_name" >
        <activity
            android:label="@string/app_name"
            android:name="uk.co.quarterstaff.rpschess.RpsChess"
            android:screenOrientation="portrait" >
            <intent-filter >
                <action android:name="android.intent.action.MAIN" />

                <category android:name="android.intent.category.LAUNCHER" />
            </intent-filter>
        </activity>
    </application>

</manifest>
This post doesn't tell the whole story of measuring views, but it will suffice for now. Next up we'll put pieces on the board.


Hi Chris..
Thanks a lot for this tutorial…I was searching tutorials for this chess board for past 2week..Now I have completed this screen and moving to next step, that is Placing coins on the board.Hope it work…
thanks once again for this tutorial….